
Organizing your hashtags and keywords is essential for managing your content on platforms like Instagram, YouTube, and more. Today, I’ll guide you step-by-step to create a powerful and easy-to-use Hashtag and Keyword Manager in Google Sheets. This tool will keep everything organized, allowing you to copy and paste hashtags seamlessly. Let’s dive in!
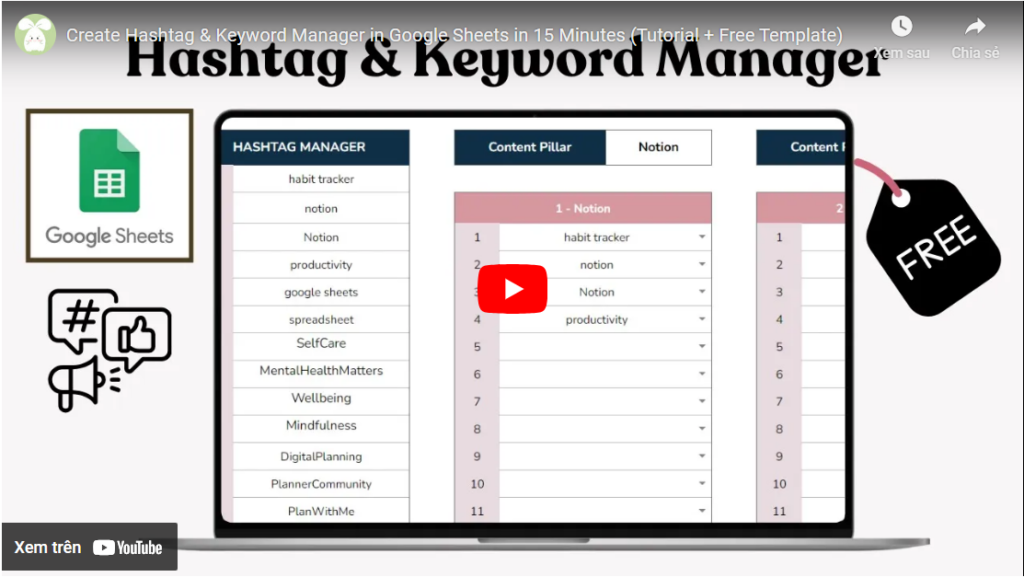
Step 1: Setting Up Your Spreadsheet
- Start with a Blank Spreadsheet: Open a new Google Sheet.
- Resize Rows and Columns: Adjust them to fit the content better. Use alignment settings to center your text both horizontally and vertically for a clean layout.
Step 2: Creating the Hashtag Manager Section
- Merge Cells for the Title: Select two cells, merge them, and name this section “Hashtag Manager.”
- Add a Number List: Use the
SEQUENCEfunction to generate a list of numbers. Here’s the formula:excelCopy code=SEQUENCE(50,1)This creates a column of numbers from 1 to 50 for indexing your hashtags and keywords. - Apply Borders: Select the entire data range and apply borders to make everything neat.
Step 3: Structuring the Content Pillars
- Add Content Pillars: Create columns for Content Pillars, Hashtags, and Keyword Categories.
- Number the Content Pillars: Use the
CONCATENATEformula to add numbering:excelCopy code=CONCATENATE(1, " - ", G2)ReplaceG2with the cell containing your content pillar name. This ensures clarity and helps track your pillars.
Step 4: Dropdown Menus for Easy Selection
- Add Dropdown Menus:
- Go to Insert > Dropdown.
- Set the range of cells where hashtags are stored.
- Customize display styles (e.g., arrows) for easier navigation.
- Combine Selected Hashtags: Use the
TEXTJOINfunction to merge selected hashtags into a single string.
Here’s the formula:excelCopy code=TEXTJOIN(", #", TRUE, F5:G34)- The delimiter
", #"separates hashtags. - Replace
F5:G34with your data range. - Ensure your range matches your data structure to avoid errors.
- The delimiter
Step 5: Customizing the Design
- Enhance Visual Appeal:
- Turn off gridlines for a cleaner look.
- Change fonts to something visually pleasing.
- Add Colors: Use a color palette from Pinterest or your favorite tool. The Eyedropper tool can help you extract colors from an image for a cohesive theme.
Step 6: Final Touches
- Copy and paste the Content Pillar section as needed.
- Resize columns for better readability.
- Test your dropdowns and hashtag merging to ensure functionality.
Bonus: Monthly Social Media Content Planner
If you’re looking for a way to streamline your content creation process, check out my Monthly Social Media Content Planner!
- Features: Templates, progress tracking, and user-friendly design.
- Price: Just $2.99!
Get yours today by clicking the link in the description.
Conclusion
With this Hashtag and Keyword Manager, you’ll save time and effort while keeping your content strategy organized. Try it out and let me know how it works for you!
Thanks for stopping by, and don’t forget to share your thoughts in the comments below. See you next time!